1. Transferring Calls
To Transfer a call to another person
Press Transfer button – the caller goes on hold automatically
Then dial the number you want them to send them to…
You have 2 choices.
Press transfer a second time – so the caller is just transferred
OR
You can speak to the person and explain – So and so is on the and would like to Then press transfer to complete the pass off.
To transfer a call directly to into voicemail
Press Transfer button – the caller goes on hold automatically
Then press * and the users extension
Then press the transfer to pass the call
transfers are always 2 presses of transfer button
2. Access Voice Mail Remotely
To Access Voice Mail externally:
Call your Main number
Press the * key.
Enter your ID (Your 5 digit extension for assigned voicemail extension).
Enter your password.
3. Basic phone functions
To Place a call:
Lift the handset and dial the number. (You MUST dial an 8 to get an outside line). or
Press a line button and dial the number. or
Press the SPEAKER button and dial the number. or
To Answer a call:
Lift the handset. or
Press the line button associated with the call. or
Press the Answer soft key. or
Press the SPEAKER button.
To End a call:
Hang up the handset. or
Press the SPEAKER button. or
Press the EndCall soft key.
To place a call on Hold:
During an active call, press the Hold soft key.
To return to the call press the Resume soft key.
If you have multiple calls on hold, press the NAVIGATION button to select the desired call before you press Resume.
To Redial the most recently dialed number:
Lift the handset and press the Redial soft key, or simply press the Redial soft key to activate the speakerphone.
To Mute a call:
Press the MUTE button. The MUTE button automatically lights, indicating that the calling party cannot hear you.
To turn off mute, press MUTE again (or lift the handset).
Call transfer:
During a call press the Transfer soft key. This places the call on hold.
Dial the number or office extension to which you want to transfer the call.
When it rings on the other end, press Transfer again. Or, when the party answers, announce the call and then press Transfer. If the answering party does not want the call press End Call then press Resume to go back to the original caller.
To Park a call:
During an active call, press the More soft key until you see the Park soft key.
Press Park. The LCD screen displays the special call park number at which the call is stored.
Make a note of the call park number, then hang up. The call is parked at that number, allowing you to retrieve it from another phone.
To retrieve the parked call from any phone in the Cisco CallManager system, dial the call park number at which the call is parked.
Call Pickup:
Press any available line button on your Cisco IP Phone.
Press the More soft key.
Press the PickUp soft key. The call now rings on your phone.
Press Answer and the call will go to your phone.
Forwarding Calls:
Press the CFwdAll soft key. You should hear two beeps.
Enter the number to which you want to forward all of your calls, exactly as you would if you were placing a call to that number. (After you enter the number, an animated phone icon with a flashing right arrow appears in the upper-right corner of the LCD screen. The LCD screen also displays a message confirming the number or extension to which your calls are being forwarded).
To cancel call forwarding, press the CFwdAll soft key.
Placing a Conference Call:
During a call, press the More soft key and then the Confrn soft key. Doing so automatically activates a new line and puts the first party on hold.
Place a call to another number or extension.
When the call connects, press Confrn again to add the new party to the conference call.
Repeat these steps to add parties to the conference call.
Using the Directories Button:
Press the Directories button.
Use the Navigation button to select the desired directory from the Directories menu, then press the Select softkey.
Enter the search criteria to retrieve a record.
To place a call from any directory, use the Navigation button to select the record, then press the Dial softkey or simply lift the receiver.
Press the Exit softkey twice to exit the Directory menu.
To Access Voice Mail internally:
To set up and access voice mail, first press your line button
Then press the Messages button on your Cisco IP Phone (teachers should then press the * key) and follow the voice instructions.
The default password is 13579.
Remember there is a difference between your voicemail ID and your password
**Note: If you enter your password incorrectly (3 times) you will be locked out of the system, please wait approximately 30 minutes and phone will reset itself.
To Access Voice Mail externally:
Call the Main #
Press the * key.
Enter your ID (Your 5 digit extension for assigned voicemail extension).Enter your password.
4. Conference / Meet Me Call
There are 2 ways to setup a conference call;
Conference Button (adhoc) (unplanned, end user calls each party)
- During a call, press the More soft key and then the Confrn soft key or the button with 3 little heads
 . Doing so automatically activates a new line and puts the first party on hold.
- Place a call to another number or extension.
- When the call connects, press Confrn again to add the new party to the conference call.
- Repeat these steps to add parties to the conference call.
Meet Me
(pre-planned, dial in conferences)
The first conference initiator must be an internal caller....
- The initiator presses the 'New Call Button' then 'More' until you see and press the MeetMe button, you will hear 2 beeps then dial 8000
- The display will change to “To Conference” when the next attendee joins (now the meeting/conference session is live)
*Any other user internal (boces lan) that wants to join can just dial 8000 (they do not use the meetme button)
-
External callers may now call 315 386-4504 and then dial extension 8000 and they will be joined.
If the conference hasn’t been started the user will get a voice mail message stating the conference is not in session and to please try back, then they will be disconnected.
The conference will remain in session until the last folks disconnect even if the initiator has disconnected, also this means that people are still able to continue speaking and even join after the initiator has left. The conference software will not end until all attendees have hung up.
5. Voice Mailbox Setup
When you have a message the red message indicator light will be lit on the handset. To check your messages press the message button and enter your private pin code when prompted, the system will read you the options for managing your messages.
The first time you check your messages the system will ask you to customize your voice mailbox. The system talks you through the setup of your mailbox but we strongly recommend reading through steps 1-4 before you proceed to be prepared to answer the questions when the system asks you.
There are 4 basic setup steps:
- Enter your pin number (the default is 13579)
- State your name as it will be announced to any user who leaves you a voicemail (be sure to press # when you are done stating your name)
- Leave a personalized message (I am on the phone or away from my desk , or any statement you wish to set. Press # when you are done with your personalized message- you will have the opportunity to re-record or accept that recording and can re-record as many times as you need.)
- Change your pin number to a confidential number made up of 6 or more numbers
To Access Voice Mail internally:
To set up and access voice mail, first press your line button
Then press the Messages button on your Cisco IP Phone (teachers should then press the * key) and follow the voice instructions.
The default password is 13579.
Remember there is a difference between your voicemail ID and your password
**Note: If you enter your password incorrectly (3 times) you will be locked out of the system, please wait approximately 30 minutes and phone will reset itself.
To Access Voice Mail externally:
Call the Main #
Press the * key.
Enter your ID (Your 5 digit extension for assigned voicemail extension).Enter your password.
If you have any issues please contact the SLLBOCES helpdesk or call 10101 as they can reset the process to start over.
1. Accessing Email
For users that have been updated and migrated, please use: https://outlook.office.com
All other users please use: https://mail.sllboces.org/owa
2. Changing Email Password
How to change your SLLBOCES Passwords
Many SLLBOCES systems use the same password as your exchange email account. So changing this will also cover your SLLBOCES 365 account, SLLBOCES Google App account, SLLBOCES website login password, and the SLLBOCES School tool teacher login. Please keep in mind if you have a computer or laptops that is in the main ESC building or the tech centers then this will also update your computer login password also.
If you do not use all these systems that is fine it is the same process if you use all or none of these additional ones. This process does not affect WincapWeb or WincapProgram login passwords.
There are 2 methods to changing SLLBOCES password the most common is
Method 1 ** If you use web mail or the Email button off the main SLL BOCES page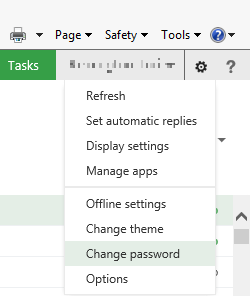
Login to your email account and then in the upper right of the screen click the gear next to your name and choose change password from the drop down list.
Fill in the form there with your existing password and then enter a new unique password in the next two boxes.
There is an 8 character minimum made up of uppercase letters, lowercase letters, number and a special character like a #,$ or * etc and it may not contain your first or last name.
OR
Method 2 ** If you have a computer or laptop that is in the main ESC building or the tech centers then you can press the Ctrl and Alt and Del keys all at the same time and choose the Change password option on that screen and a form will appear. Please use the same 8 character requirements as above.
If you have any problems with resetting your password or have forgotten it, please contact the SLLBOCES Helpdesk x10101 or the full number at 386-4504 x 10101.
3. Google Password Redirect

Please know that because your account is synced with Active Directory you cannot change your password from Google.
To change your password please follow these instructions below:
- Using a Windows computer/laptop open Internet Explorer (blue "e" with gold ring)
**Cannot use Chrome, Edge (white e), Firefox, or Safari, this will error out and not work**
- Go the BOCES Homepage (https://www.sllboces.org)
- Click "E-Mail" in the top right corner of the page
- Enter your BOCES Email credentials (please use your full email address not "canton\username") and enter your current password
- It will prompt you to change your password, please know your password must contain the following:
- At least 8 characters
- Upper / lower case letters
- Cannot contain your first or last name
- Cannot be the same as one of your previous 4 passwords
Once you have changed your password in Outlook your BOCES Google account and School Tool password will sync and also be changed/updated to your new password.
If you still cannot change your password, or have any questions please contact our helpdesk at helpdesk@sllboces.org or 315-386-4504 ext 10101
4. How to Setup Email on iOS Devices
- Open the Email section under "Settings"
- Add an "Exchange account"
- Enter your SLL BOCES email address — username@sllboces.org
- Server— mail.sllboces.org
- Domain— canton
- Username— username (first part of email, do not add @sllboces.org)
- Password— your secure password
- Use, enable SSL
If you have any problems please contact the helpdesk at ext 10101
5. Microsoft Office Lens
Microsoft Office Lens is a great
way to capture information from documents, whiteboards, business cards,
receipts, menus, signs, handwritten memos, or anything else containing text that
you want to import but not manually type out yourself. With Office Lens, you
don’t need to jot down any notes by hand, rely on blurry cell phone images, or
worry about misplacing anything.
Office Lens is great for
capturing sketches, drawings and equations too — even images without text. When
capturing images, Office Lens gets rid of shadows and odd angles, so your final
captures are easier to see. You can upload document and whiteboard images to
Microsoft OneNote, Word, PowerPoint, or OneDrive, and you can also save them as
PDF files or send them in email.